2021年11月30日星期二

JPRO, User-friendly Design and Interactive Features, Your Entire Cart

HAPPIER TECHNICIANS, HEALTHIER TRUCKS
Empower your technicians with the all makes, all models diagnostic and troubleshooting tool to maximize shop efficiency and vehicle uptime.
“JPRO’s advanced capabilities met the needs of the maintenance facilities.

FROM FAULT TO FIX — FASTER THAN EVER
Commercial vehicles are complex. With more components and electrical systems than ever before, vehicle maintenance has become a moving target. JPRO simplifies the process, helping techs of all skill levels achieve faster, more accurate repairs.
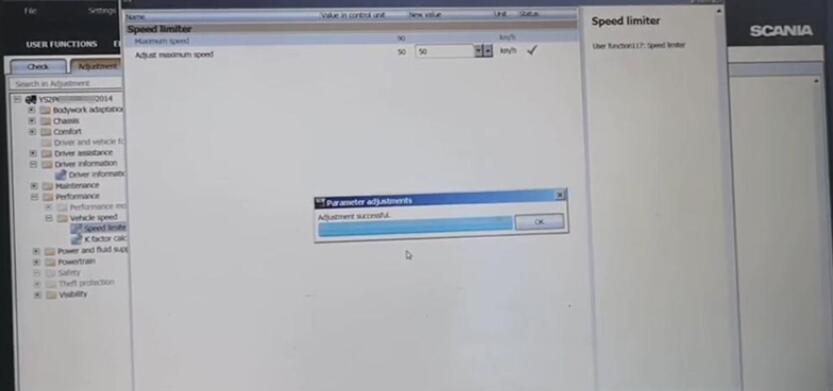
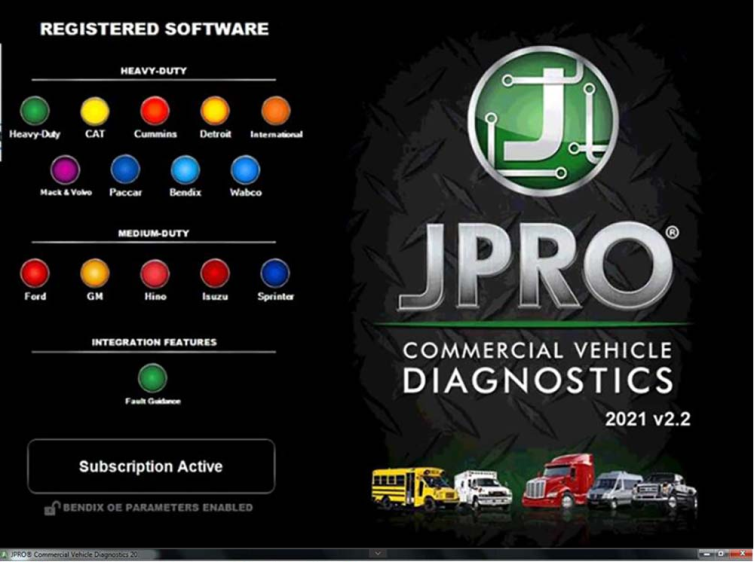
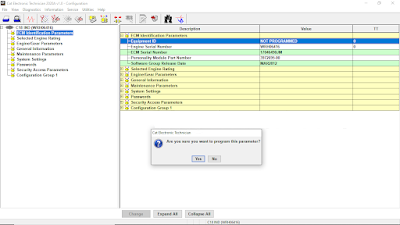
JPRO DIAGNOSTICS
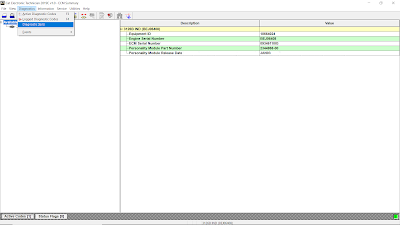
Quickly connect to vehicles and get instant diagnosis assistance for all truck components and ECUs. With JPRO’S easy-to-use interface and guided diagnostics, technicians of all skill levels can diagnose with the speed and precision of industry veterans.
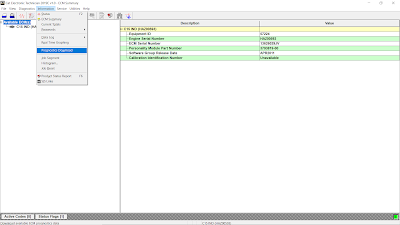
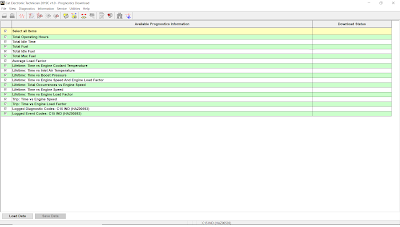
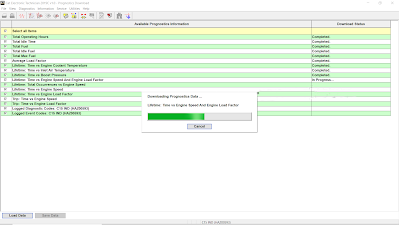
VEHICLE REPORTS: Automatically capture pertinent vehicle details to bring into configurable reports such as inspection and preventative maintenance.
EMPOWER TECHNICIANS: Detailed and easy-to-follow and step-by-step repair instructions will make you feel like there’s a master mechanic in your shop helping technicians of all skill levels perform with the speed, accuracy, and knowledge of a lead tech.
SYMPTOM-BASED REPAIRS: No Fault? No problem! Fix the issues your diagnostic tool can’t detect and empower technicians to quickly solve the symptom-based issues that often trouble even the top mechanics.
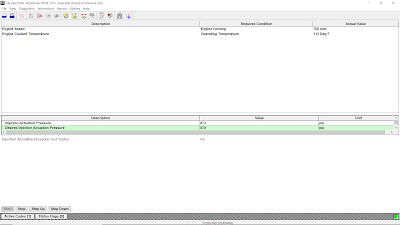
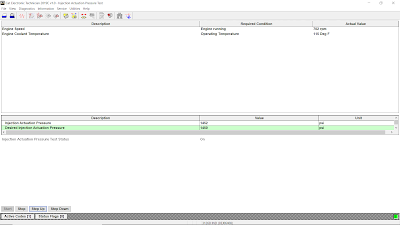
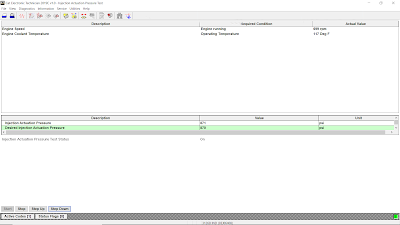
GUIDED TROUBLESHOOTING: Procedures, installation guides, and wiring diagrams based on live fault and vehicle data.
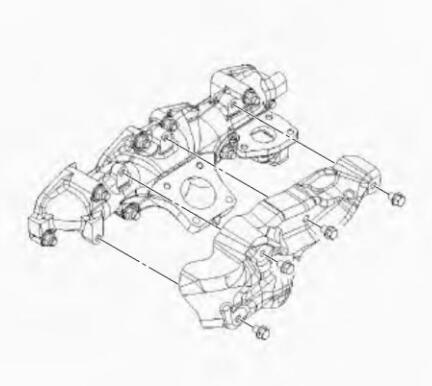
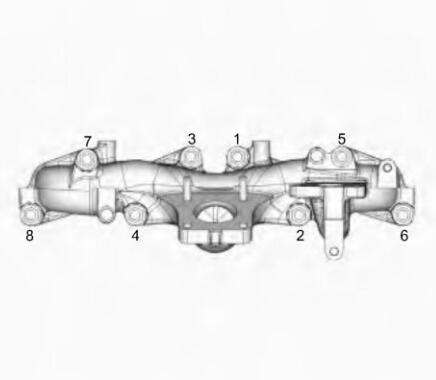
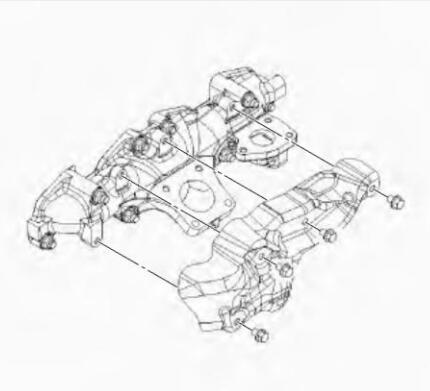
DETAILED IMAGES: Find the right component, pin, or other part with detailed images and schematics so you can make the correct repair, every time.

Get trucks back on the road and improve shop revenue by turning over bays like a pro!
Enables you to maximize uptime by quickly addressing issues affecting the health, safety, and performance of your fleet while it’s on the road.

2021年11月29日星期一

The John Deere Service Advisor EDL(Electronic Data Link) v3 Truck Diagnostic Replaces EDL v2

This is genuine John Deere Service Advisor EDL v3 Kit, and it is the newest adapter from John Deere and it replaces the John Deere EDL v2. The John Deere EDL3 was designed and manufactured by IDSC Holdings LLC for Cummins Inc. John Deere Electronic Data Link EDL is genuine dealer diagnostic PC-to-vehicle interface compatible with Service ADVISOR software installed in the Lenovo T420 laptop, so you can use directly after receiving the package, which is genuine dealer diagnostic PC-to-vehicle interface compatible with Service ADVISOR software.

The Multifunctional John Deere dealer diagnostic tool is designed to serve the construction, agricultural, and forestry equipment, as well as various engine technology produced by John Deere. The EDL3 source code is a confidential trade secret of ID SC Holdings LLC, they improved USB connector increased memory RAM and vehicle communicate.

Important Notice: John Deere EDL v3 drivers are built-in with the Service Advisor application. Please do not try to install the driver and the anti-virus application or set windows system by yourself, using the setup files from any not reliable sources may lead to unstable work of your windows OS.

The product includes in 1pc x Electronic Data Link v2, 1pc x USB cable, 1pc x 9-pin Deutsch adapter, 1pc x Second Hand Laptop Lenovo T420 Laptop (With AG or CF or CCE software)

Top 5 Reasons to get John Deere EDL V3 Adapter:
1.Latest version V5.2 John Deere Service Advisor EDL V3. It supports John Deere vehicles up to 2018
2. Multi-language available: English, French, Italian, Spanish, Portuguese
3. Online technical service remotely if you have the issues
4. Real test with Jd and 100% work greatly
5. John Deere EDL V3 is compatible with specialize software dealer JD.

What are the the advantages of EDL V3 Data Link?
Improvements on EDL v3 Improved USB connector utilizing automotive grade latching system Increased memory RAM Improved vehicle communications processor Support of multiple 500K baud rate CAN Bus recordings Longer range wireless connectivity Improved Bluetooth connection speeds utilizing Bluetooth 2.1 with EDR (J1939 compliant) Functions and technical capabilities of JD diagnostic adapter: Troubleshooting; Setup and Calibration ECU; Interactive tests; Computer programming; Diagnostic Code Reader, and much more.

2021年11月26日星期五

Scania VCI3 Scanner setting Speed Limit for Scania

This is a guide on how to set the Scania speed limit by the Scania VCI3 scanner via Scania Diagnosis & Programmer 3 (SDP3). Start it up.
Connect the VCI3 scanner to this Scania via the OBDII port and do not forget the front passenger PIN code.
Scania-VCI3-Scanner-setting-Speed-Limit-for-Scania-1
Scania-VCI3-Scanner-setting-Speed-Limit-for-Scania-2

First turn on the car.
Run SDP3 app.
Enter “Checks and adjustments”. The loading process may take a few minutes.
Scania-VCI3-Scanner-setting-Speed-Limit-for-Scania-3

Go to
FUNCTIONS>>Adjustment
Unfold
Performance>>Vehicle speed
Select “Speed limiter” “Adjust maximum speed” and click on “Change”.
Scania-VCI3-Scanner-setting-Speed-Limit-for-Scania-4

Depending on the customer’s requirements, we set it from 85 to 50 km / h and click on Execute.

Scania-VCI3-Scanner-setting-Speed-Limit-for-Scania-5

Scania-VCI3-Scanner-setting-Speed-Limit-for-Scania-6
Complete! Nice and simple! If the car drives over 55 km / h, it is automatically set to less.

2021年11月24日星期三

JOHN DEERE EDL V2 DIAGNOSTIC KIT USER MANUAL


John deere EDL V2 diagnostic kit with Service Advisor EDL V2 V4.2 Software, you can view service manuals, use DTAC (Technical Assistance Center) data, make diagnostics, readings, tests and calibrations, re-program controllers.

John-Deere-EDL-V2-Diagnostic-Kit-User-Manual

John Deere EDL V2 Diagnostic Kit Overview

1. Support Languages: English

2. Software: the software come with the hard disk is John Deere Service Advisor 4.0, supports vehicle till 2016, newer software supports vehicles till 2018, check Service Advisor V5.2

3. HDD comes in default VMware Windows XP system only, supports host machine Win XP, Win 7, Win 8 and Win 10

4. Real test with John deer and 100% work great

5. Two year warranty

6. V4.2 software is multi-language too, support English, French, Spanish, Portuguese & Italian

John Deere EDL V2 Highlight

1. John Deere Service Advisor EDL (Electronic Data Link) heavy duty diagnostic adapter for construction equipment, agriculture, engines For John Deere.

2. John Deere Diagnostic kit includes software For John Deere Service Advisor 4.0 Agriculture or Construction and Forestry version.

3. John Deere Service Advisor 4.0 Agriculture workshop service manual, repair manual, electrical wiring diagram, hydraulic diagram, diagnostic, assembly and disassembly engine, transmission.

4. John Deere AG Management Solutions, Attachments, Backhoes, Combines and Headers, Cotton Harvestings, Excavators, ForkLifts, Hay and Forages, MAte Hand Cut and Shredderses, Plantings and Seedings, Skid Steers, Sprayers, Sugar Cane Harvesters, Tillages, Tractors, Worksite Pro Attachments.

5. John Deere Service Advisor 2.8 CF (Construction and Forestry), workshop service manual, repair manual, diagnostic, electrical wiring diagram, hydraulic diagram For John Deere.

6. John Deere Service Advisor 4.0 CCE (Commercial and Consumer Equipment)dealer technical assistance, diagnostics, connection readings, calibrations, interactive tests, specification, tools, assemble and disassemble presented all models For John Deere Construction Equipment and some models Hitachi, Euclid, Bell and Timberjack.
How To Install Service Advisor 4.0 Drive?

Tips:

4.0AG, 4.0 CCE and 2.8 CF standard software package comes in hard drive (HDD) format, easy to install.

HDD comes in default VMware Windows XP system only, supports host machine Win XP,Win 7,Win 8 and Win 10. (If your computer supports WinXP VMware, it should work).

2021年11月22日星期一

Some FAQS for jpro Professsional Truck diagnostic scan tool

when you operate the Jpro professional Truck Diagnostic scan tool what problems did you meet ,today glad have chance to share some FAQs for Jpro professional truck diagnostic scan tool .

JPRO Professional truck scanner is the most comprehensive and powerful all makes, all models diagnostic tool available in the industry today. In one, easy annual subscription, JPRO provides a complete & unparalleled diagnostic service & repair solution with bi-directional functionality.

Some-FAQS-for-jprp-Professsional-Truck-diagnostic-scan-tool

Here show the FAQ for your reference ,hope that could help for you when you meet same questions .
1: Q: What is lastest software version . if there is the newest version ,i must update or can use my own software that has year limited ?
A: Now the lastest software version is 2021 V2.2 ,And if you need not update the software ,you can continue to use .and have no year limited .

2:Q : Why i can’t connect with Wifi ,and the software include chinese ?
A : Jpro professional truck diagnostic tool ,the hardware is without the wifi , if customer did not have any demand for the language before delivery , we will send the english software version .

3:Q: The jpro main function ?
A:JPRO empowers diesel technicians to diagnose and repair all makes models and components ,Jpro reduces a technician’s dependency on Oem software by offering industry leading bi-directional controls ,including DPF regens ,cylinder cutouts ,parameter changes ,and much more.

4:Q:What trucks will Jpro work on ?
A:For commercial Vehicles ,Jpro is an all makes ,models and components solutions ,for detailed information ,check out our coverage chart .

5:Q: What adapters work with JPRO?
A: For the most reliable connection and functionality, we recommend a Noregon DLA+ 2.0 adapter but any RP1210C compliant adapter should work with JPRO.

6:Q.If I buy JPRO, do I need anything else?
A:JPRO software requires a compatible Windows based PC, laptop, or tablet, RP1210C compliant adapter, and the appropriate cable that connects the computer to the vehicle’s OBD-II, 9-pin, or 6-pin port.

PLEASE NOTE: JPRO’s HD support for Mack and Volvo only supports the following adapters: • Noregon DLA+, DLA+ Wireless, DLA+ 2.0, DLA+ 2.0 Wireless, and DLA+ PLC • Vocom 88890300 • NEXIQ USB-Link, USB-Link 2

PLEASE NOTE: Ford, GM, Isuzu or Sprinter mediud-duty vehicle require any of the following adapters for connection: Noregon DLA+, DLA+ Wireless, DLA+ 2.0, DLA+ 2.0 Wireless

7:Q :Do I need internet access for JPRO?
A: An internet connection is not necessary for connecting to the vehicle, or for using many features in JPRO, but certain tools like Fault Guidance and NextStep Repair require an active connection. Additionally, setup, updates, license verification, or submission of information to third-party warranty systems require internet access.

8: Q:Can JPRO perform bi-directional vehicle tests?
A:Yes! JPRO comes loaded with industry-leading bi-directional tests for the makes and models you commonly repair. For a full list of included tests, visit our coverage chart.

9:Q:If I have OEM software, why do I need JPRO?
A:Diagnosing on a component-by-component basis is time consuming in an industry where time is extremely valuable. JPRO covers all components on the vehicle to provide users with a holistic view of total vehicle health.

2021年11月20日星期六

How to install and Activate Cat caterpillar III Software

CAT Caterpillar ET Diagnostic Adapter III Compatible Vehicle: For Trucks, Excavators, Air Compressors, Ships, Drilling Rigs.

And the latest software is 2021B : https://www.obd2tool.com/goods-10220-Cat-Caterpillar-ET-Cat-ET-3-Software.html

Recently some friend asked us .when they received the device .and connect with everything well ,but The software is not working to finish the installation like below picture :

How-to-install-and-Activate-Cat-caterpillar-III-Software

The cat caterpillar iii is with laptop and without laptop .if you buy the device with the laptop .you can use it directly .because they have installed the software well on the computer before delivery .if you buy the cat caterpillar III without laptop ,the software is putted in the CD ,when you received the package and want to install the software ,you could not install the software in the CD ,You need copy the software to computer from CD .then you can install it on the computer .

If you want to update the software ,you can search our store : www.obd2tool.com .or contact with us : sales@obd2tool.com.we can send the software to you by email after payment .

2021年11月19日星期五

How to install john deere service advisor 4.2.005 on win 10 64bit

John deere EDL V2 diagnostic kit with Service Advisor EDL V2 V4.2 Software, you can view service manuals, use DTAC (Technical Assistance Center) data, make diagnostics, readings, tests and calibrations, re-program controllers.

How-to-install-john-deere-service-advisor-4.2.005-on-win-10-64bit-1

John Deere EDL V2 Highlight
1. John Deere Service Advisor EDL (Electronic Data Link) heavy duty diagnostic adapter for construction equipment, agriculture, engines For John Deere.
2. John Deere Diagnostic kit includes software For John Deere Service Advisor 4.0 Agriculture or Construction and Forestry version.
3. John Deere Service Advisor 4.0 Agriculture workshop service manual, repair manual, electrical wiring diagram, hydraulic diagram, diagnostic, assembly and disassembly engine, transmission.
4. John Deere AG Management Solutions, Attachments, Backhoes, Combines and Headers, Cotton Harvestings, Excavators, ForkLifts, Hay and Forages, MAte Hand Cut and Shredderses, Plantings and Seedings, Skid Steers, Sprayers, Sugar Cane Harvesters, Tillages, Tractors, Worksite Pro Attachments.
5. John Deere Service Advisor 2.8 CF (Construction and Forestry), workshop service manual, repair manual, diagnostic, electrical wiring diagram, hydraulic diagram For John Deere.
6. John Deere Service Advisor 4.0 CCE (Commercial and Consumer Equipment)dealer technical assistance, diagnostics, connection readings, calibrations, interactive tests, specification, tools, assemble and disassemble presented all models For John Deere Construction Equipment and some models Hitachi, Euclid, Bell and Timberjack.

How to install Heavy Duty Scanner john deere service advisor 4.2.005 on win 10 64bit
1/you must have enough disk space to download the full set of February 2016 data base (52Gb); it comes with seven iso images and the SA4.0 image and a February 2015 update which you don’t need and of course the activator.
2/use an iso mounter software to mount the SA4.0 image to a virtual drive.
3/browse to the setup file in your virtual drive and run it as administrator
follow the steps (it will prompt for a username and password use those of your windows user account if you’re under 7-8 or 10 windows version)
it will take a while! don’t turn off the computer and don’t worry about the incompatibility messages that windows will show you during the installation process specially for the SQL 2005 server installation.
4/after completing the installation of the SA4.0 reboot the computer and set back the system time to mars 2016.
5/mount the first iso image of the data discs to a virtual drive, browse the sauce folder and run setup file as administrator; wait for it to complete the installation it will launch the SA 4.2.005 at this step you may have a message that the SA 4.2.005 is not capable of launching the search engine don’t worry close it and go to task manager (ctr+alt+sup)
click on services and look for the LightweightIDOL service if it’s stopped than run it.
6/run the activator as administrator and activate the service advisor; don’t use the prolongation tool at this step!.
7/now go to the task manager again and look for the SAupdater service and disable it.
8/re-open the service advisor, click the accept button for the license agreement, and configure the path for the data access you can use the mapping for a virtual drive choice to map each data disc image to a virtual drive it will take more than an hour to load all the data disk.
it will ask you for scheduling the update choose the end of the week and create the task.
9/Now close the SA, use the activator again but this time just use the prolongation tool choose 9000 days or whatever you want.
10/Look for the task scheduler and run it, choose the SAupdate task and modify the time for the task to begin to 2030 or whatever you want.
11/reboot the computer and set back the time machine to the actual time, launch SA and everything must work ok.
if you have any trouble than you messed something just clean up and reinstall.

2021年11月17日星期三

Perkins Phaser1000 Series 6 Cylinder Engine Oil Cooler Pipe Change

 This is a Oil cooler pipe change/fastener change to oil components service bulletin for Perkins/1000 series 6 cylinder engine.

Perkins-Phaser1000-Series-6-Cylinder-Engine-Oil-Cooler-Pipe-Change-1

If you need more service bulletin for Perkins Engine,please visit below link:
https://www.obd2tool.com/goods-10032-Perkins-EST-Interface-Diagnostic-tool.html

From engine number YD—–U502358P, new oil filter heads and an oil adaptor head (that are fitted to the left side of the engine). Oil cooler housings and longer setscrews have also been introduced.

From engine number YD—–U502658S, new oil cooler pipes have been introduced for engines with the starter motor on the left side of the engine.

The part numbers of the components affected are listed in the following table.

Perkins-Phaser1000-Series-6-Cylinder-Engine-Oil-Cooler-Pipe-Change-2

The new oil filter heads, adaptor and oil cooler housings have deeper threads in their flanges for the oil cooler pipes. The depth of the threads is increased from 16 mm (0.6 in) to 20 mm (0.8 in), the depth of the holes have not been changed.

The new pipe assembly has a cast block at each end and the pipes are flexible along their full length. When the new pipe assembly is fitted, discard the spacer fitted between the oil filter head and the oil cooler pipes.

Note: Ensure that the braid of the pipes is not damaged.

The correct setscrews are listed below, by part number and the under head length, for use with the various arrangements of both early and new components which could be used in service.

As the oil cooler housings, filter heads and the adaptor do not have their part number on them, check that the depth of the threads are correct and that the setscrews are the correct length before the oil cooler pipes are fitted.

Perkins-Phaser1000-Series-6-Cylinder-Engine-Oil-Cooler-Pipe-Change-3

More information for Perkins,please refer to Perkins Trouble Repair

2021年11月12日星期五

Injection Actuation Pressure Test using Caterpillar ET Software

Injection Actuation Pressure Test using Caterpillar ET Software

Injection-Actuation-Pressure-Test-using-Caterpillar-ET-Software-1

#Purpose
The Injection Actuation Pressure Test function checks for leaks on all hydraulic components. This test allows the user to change the desired pressure and then view the actual pressure results.

#Accessing
To run the Injection Actuation Pressure Test function:
1). Connect CAT Caterpillar ET to the Service Tool connector.

2). Select Diagnostic Tests from the Diagnostics menu.

Injection-Actuation-Pressure-Test-using-Caterpillar-ET-Software-2

3). Select Injection Actuation Pressure Test from the submenu. Click Start.

Injection-Actuation-Pressure-Test-using-Caterpillar-ET-Software-3

4). The Injection Actuation Pressure Test screen is displayed.

Injection-Actuation-Pressure-Test-using-Caterpillar-ET-Software-4

#Screen Layout
The Injection Actuation Pressure Test screen has the following areas:
A. Display Area
The Injection Actuation Pressure Test setup condition area has three columns:

*  Description – Provides the name of the parameter set to run the test
*  Required Condition – Displays the value that the parameter must meet in order to run the test
*  Actual Value – Displays the actual value of the parameter listed in the Required Condition column

B. Status Parameter
The Injection Actuation Pressure Test status parameter area lists parameters and their current values and units of measure. The parameters listed in this area are dependent on the product being tested.

C. Status Line
Test status line indicates whether the test is “On” or “Off”.

Injection-Actuation-Pressure-Test-using-Caterpillar-ET-Software-5

D. Buttons
The Buttons available in the Injection Actuation Pressure Test screen are:

*  Start – Click this button to begin the Injection Actuation Pressure Test
*  Stop – Click this button to stop testing
*  Step Up – Click this button to increase the desired pressure of the system. Note: This button is disabled once the pressure value is at its maximum. It may or may not be available based on the current ECM.

Injection-Actuation-Pressure-Test-using-Caterpillar-ET-Software-6

*  Step Down – Click this button to decrease the desired pressure of the system. Note: This button is disabled once the pressure value is at its minimum. It may or may not be available based on the current ECM.

Injection-Actuation-Pressure-Test-using-Caterpillar-ET-Software-7

2021年11月10日星期三

Equipment ID (NOT PROGRAMMED) on Caterpillar ET Software

Equipment ID

Equipment-ID-on-Caterpillar-ET-Software-1

Equipment ID allows the customer to enter a description into the Electronic Control Module (ECM) in order to identify the Machine, such as Model/ Unit Number. A maximum of 17 characters may be entered in the field. This Parameter is only for reference by the Customer. Note: This Parameter is not required.

#Accessing
To access the Equipment ID:
1). Connect CAT Caterpillar ET to the Service Tool connector.
2). Select Configuration from the Service menu, or click the Configuration Tool icon.

Equipment-ID-on-Caterpillar-ET-Software-3
3). Click on the plus [+] symbol to the left of a selected Configuration Group: ECM Identification Parameters, or click Expand All to display all of the Parameters in each Configuration Group for a selected ECM.

Equipment-ID-on-Caterpillar-ET-Software-2
Equipment-ID-on-Caterpillar-ET-Software-4

4). Highlight the Parameter to be changed: Equipment ID, and click the Change button. The Change Parameter Value dialog box is displayed. Enter the new value in the New Value text box (a text string of 17 characters or less).

Equipment-ID-on-Caterpillar-ET-Software-5

5). Click OK to accept the new value. The Are you sure… message box will be displayed. Click Yes to change the Parameter, or click No to keep the current Parameter value. The Configuration Tool screen will be displayed.

Equipment-ID-on-Caterpillar-ET-Software-6
Equipment-ID-on-Caterpillar-ET-Software-7

Accessing Prognostics Download on Caterpillar ET Software

Accessing Prognostics Download on Caterpillar ET Software

#Purpose
Prognostics Download allows Prognostics data to be downloaded quickly and easily from all available ECMs. This information can be saved as a text file (.txt), refer to Figure 1.1 above.

When information is downloaded and analyzed at regular intervals, certain types of Histograms and cumulative data can be valuable in identifying repairs before failure occurs. Repairs before failure provide lower repair cost and improved machine availability.

All of the data in Prognostics Download is available through other service tool functions such as Logged Diagnostic Codes or Events, Current Totals, or Histograms. Prognostics Download conveniently gathers the information into one place.

#Accessing
To run the Prognostics Download function:
1). Connect CAT ET to the Service Tool connector.

2). Select Prognostics Download from the Information menu.

Accessing-Prognostics-Download-on-Caterpillar-ET-Software-1

3).  The Prognostics Download screen is displayed.

Accessing-Prognostics-Download-on-Caterpillar-ET-Software-2

#Screen Layout
The Prognostics Download screen has the following areas:
A. Display Area
The Display Area includes the following columns:

•    Available Download Information – This column displays the available Diagnostic Codes, Cumulative Totals, and Histograms. Note: All available prognostic items are preceded by a check box. Only the checked parameters are included in the data transfer. By default, all items are checked.
•    Download Status. This column displays the progress (In Progress…) as the information is downloaded. It also indicates if the download was Completed or if it Failed.

B. Buttons
The buttons available in the Prognostics Download screen are:

•    Load Data – The Load Data button allows data to be loaded from the ECM to the Prognostics Download screen.

→Click Load Data button. As the data is loading from the ECM, the Please wait… message is displayed. Then, the Downloading… progress bar displays, showing the status of the download.

Accessing-Prognostics-Download-on-Caterpillar-ET-Software-3

The downloading process can be canceled at any time by clicking the Cancel button. The Are you sure… message box displays. Click Yes to cancel loading the data. No partial file is saved. Click No to continue the download process.
→When the download is complete, a message box displays with the result of the download.

Accessing-Prognostics-Download-on-Caterpillar-ET-Software-4

→Click OK. The Prognostics Download screen is displayed with the Save Data button enabled.

•    Save Data – The Save Data button allows the downloaded Prognostic data to be saved to a file. Downloaded data, which may include Totals, Histogram data, Logged Codes, as well as ECM Summary information, can be saved to a text file. By default, the Prognostic data file is saved by Engine Serial Number, Date the log was taken, and the Time the log was taken to the second.

→Click the Save Data button. The Save As dialog box is displayed. By default, the file is saved in the Prognostic Download folder.

Accessing-Prognostics-Download-on-Caterpillar-ET-Software-5

→Click Save to accept the download file. A message box displays the saved status of the file.
→Click OK. The Prognostics Download screen is displayed.

Accessing-Prognostics-Download-on-Caterpillar-ET-Software-6

2021年11月5日星期五

How to Remove & Install Exhaust Manifold for ISUZU 4JJ1 Engine

This instruction show you guide on how to remove and install exhaust manifold for ISUZU Euro 4 N series truck 4JJ1 engine.If you want more about ISUZU truck cases,please refer to:ISUZU Trouble Repair.

Procedures:

Removal

1.Drain the engine coolant.

2.Remove the front exhaust pipe and exhaust brake.

3.Remove the generator.

4.Remove the turbocharger assembly.

5.Remove the EGR cooler.

6.Remove the exhaust manifold heat protector.

How-to-Remove-Install-Exhaust-Manifold-for-ISUZU-4JJ1-Engine-1

7.Remove the exhaust manifold and gasket.

NOTE: Do not reuse the gasket.

Inspection

Inspection of the exhaust manifold Inspect the flatness of the installation surface of the manifold and cylinder head.

How-to-Remove-Install-Exhaust-Manifold-for-ISUZU-4JJ1-Engine-2

NOTE: Replace if the flatness is beyond the repair limit.

How-to-Remove-Install-Exhaust-Manifold-for-ISUZU-4JJ1-Engine-3

Visually check the exhaust manifold for cracks.

Installation

1.Install the exhaust manifold.

a.Assemble the projection section(1) of the gasket to the engine rear side.

How-to-Remove-Install-Exhaust-Manifold-for-ISUZU-4JJ1-Engine-4

b.Install the exhaust manifold. washer and bolt are installed, and tightened temporarily as shown in figure.

How-to-Remove-Install-Exhaust-Manifold-for-ISUZU-4JJ1-Engine-5

Legend

1.Stud bolt

2.Washer

3.Nut c. Tighten at the specified torque in the order shown in the diagram.

Tightening torque:52 N-m(5.3kg-m/38 Ibft)

How-to-Remove-Install-Exhaust-Manifold-for-ISUZU-4JJ1-Engine-6

2.Install the exhaust manifold heat protector.

Tightening torque:25 N-m(2.5kg-m/18 Ibft)

How-to-Remove-Install-Exhaust-Manifold-for-ISUZU-4JJ1-Engine-7

3.Install the EGR cooler.

4.Install the turbocharger assembly.

5.Install the front exhaust pipe and exhaust brake.

6.Install the generator.

7.Refill the engine coolant.

2021年11月3日星期三

JPRO V2019 V1 / V2ERROR MISSING REQUIRED RESOURCES SOLVE PROBLEM

Have anyone came across these error?
Is driving me nuts and I have clean a machine many times but I can’t seems to find the source of the error.

JPRO-V2019-V1--V2ERROR-MISSING-REQUIRED-RESOURCES-solve-problem-1

(Run jpro software and prompt):MISSING REQUIRED RESOURCES

JPRO-V2019-V1--V2ERROR-MISSING-REQUIRED-RESOURCES-solve-problem-2

(solve way: Completely remove the jpro diagnostic software, reinstall and activate it that is ok )

1: you will find the JPRO Diagnostic software

JPRO-V2019-V1--V2ERROR-MISSING-REQUIRED-RESOURCES-solve-problem-3

2: (Delete jpro diagnostic software)

JPRO-V2019-V1--V2ERROR-MISSING-REQUIRED-RESOURCES-solve-problem-4

3: (you will find the install file(Jprosetup2019V1 or V2 ) of Jpro diagnostic software ,),then run the install file.

JPRO-V2019-V1--V2ERROR-MISSING-REQUIRED-RESOURCES-solve-problem-5
JPRO-V2019-V1--V2ERROR-MISSING-REQUIRED-RESOURCES-solve-problem-6
JPRO-V2019-V1--V2ERROR-MISSING-REQUIRED-RESOURCES-solve-problem-7

4: when you finished software install ,you need activate software . if you did not activate tool ,pls contact with us ,we will help you to activate by the Todesk or sunflower or send the activate software to you .