显示标签为“Cat ET 3 Software”的博文。显示所有博文

2022年4月12日星期二

How to use cat et Software

 Cat ET is cat electronic technician and this is the software that caterpillar produces for basically any other technicians or a customer to be able to communicate with their engine their machine and see what the codes are and see what the sensors are reading so certain diagnostic tests on it. This is software you have to use for cat equipment.

It does not work unless it is licensed the license determines what version of et basically you have. There are about 20 different licenses out there, there’s truck only there’s taps and military. Most common is dealer and customer version.

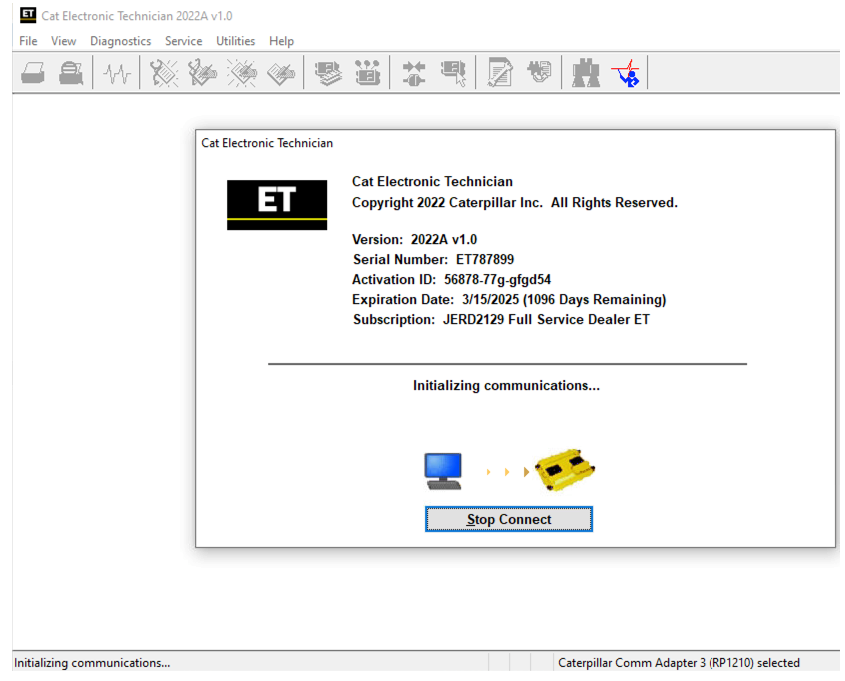
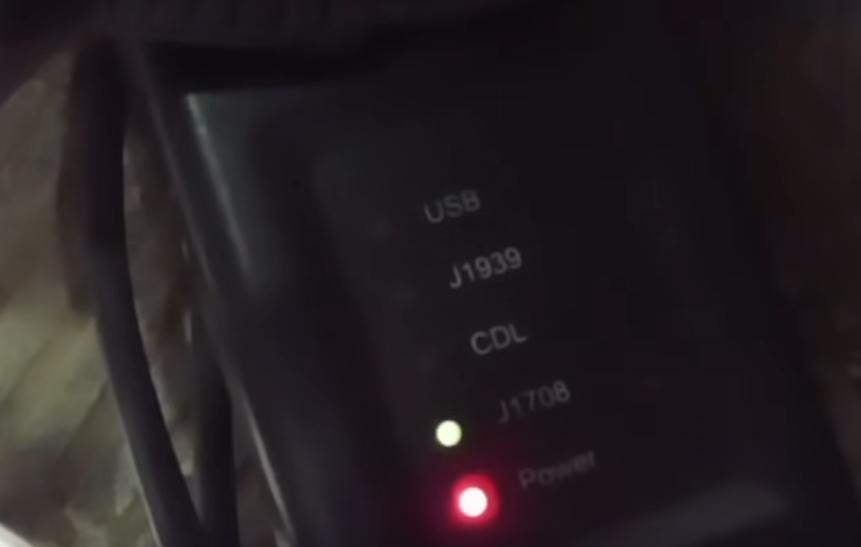
Et does not work by itself, need some sort of com adapter . if you plug into a truck you need a different adapter to go from the com adapter to truck. When you turn et on and it’s trying to communicate you should be getting at least one blinking light.

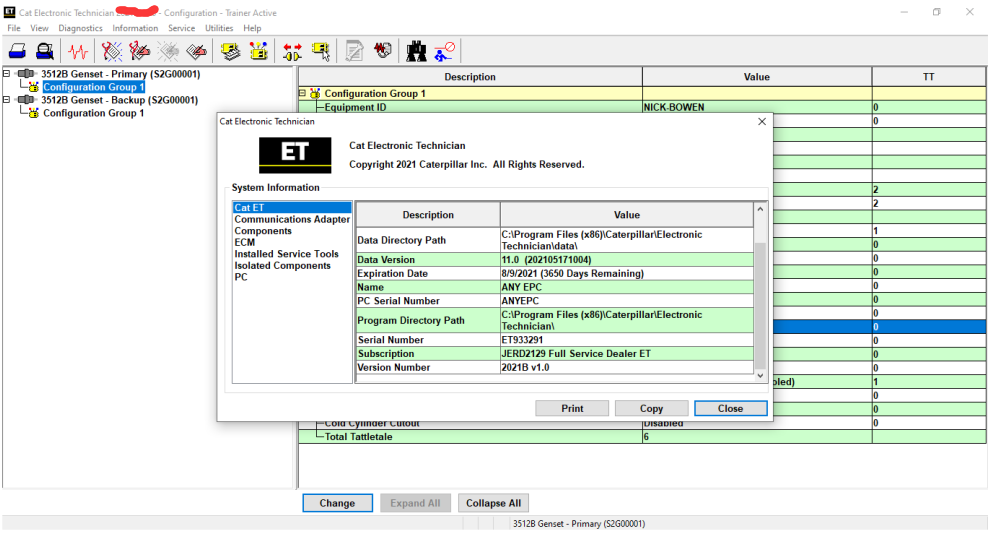
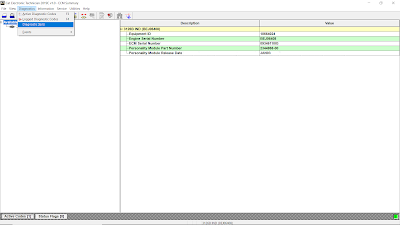
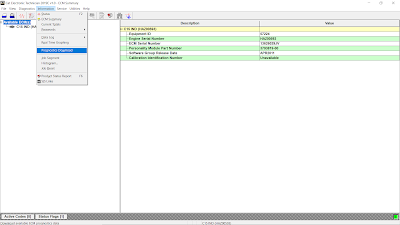
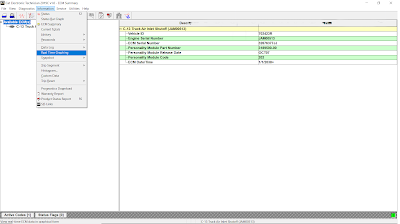
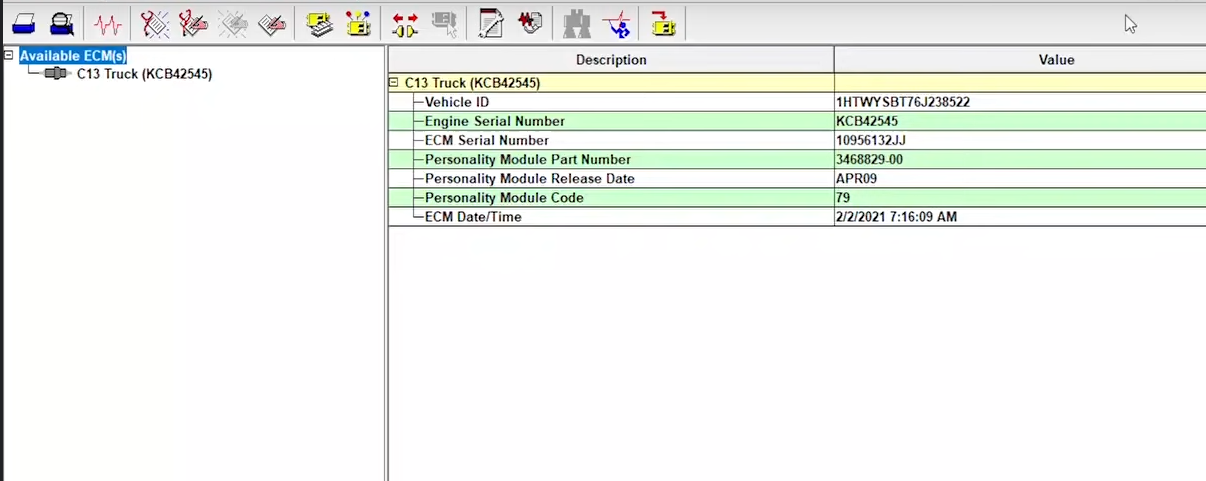
When you first connect below is the screen you going to get. This is basically a quick snapshot of info about your machine or engine. There are multiple control modules they are going to be displayed on the left this is a truck engine so long as one ecm displayed on the left. It giving some basic info like series number ecm date.

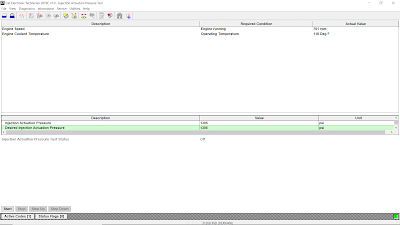
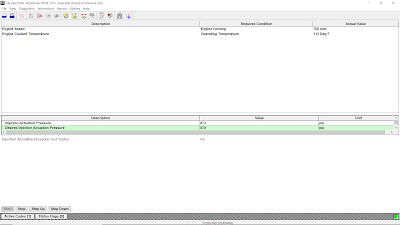
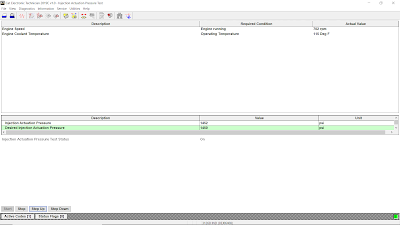
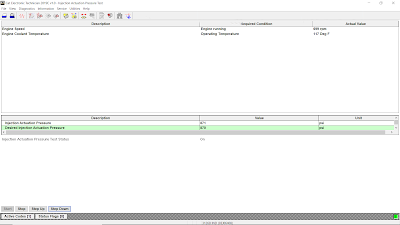
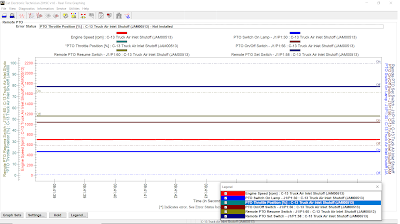
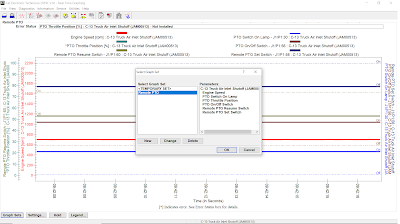
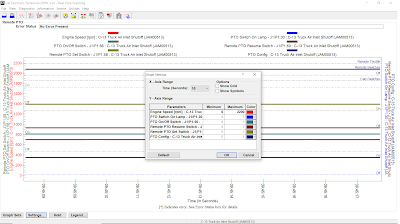
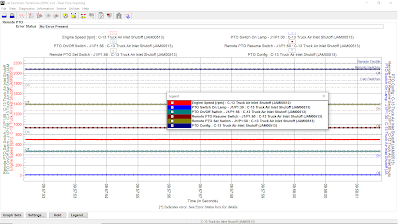
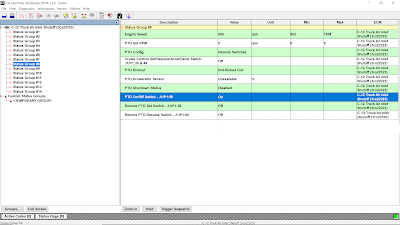
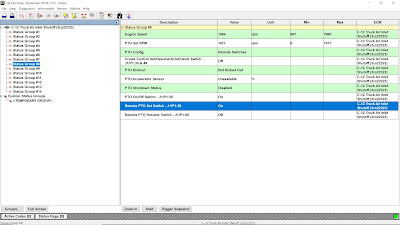
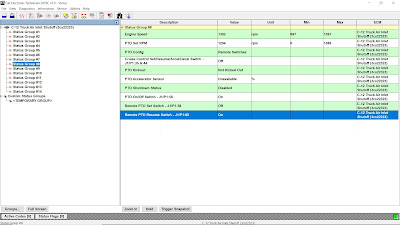
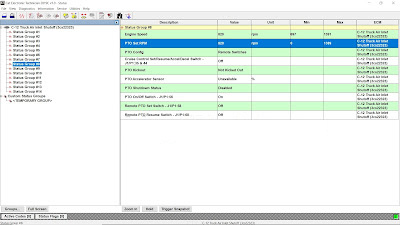
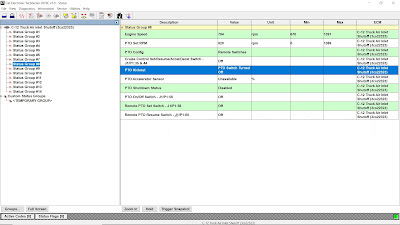
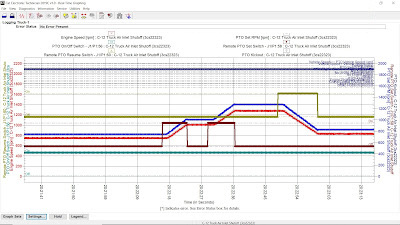
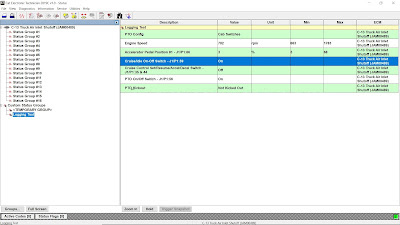
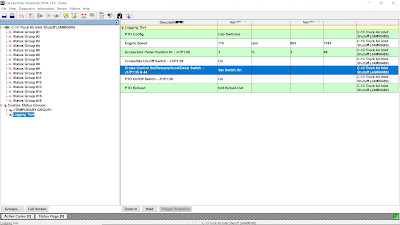
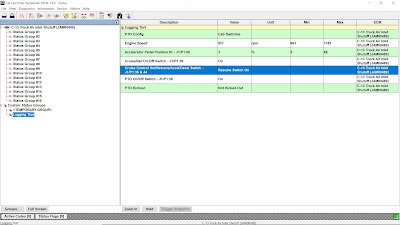
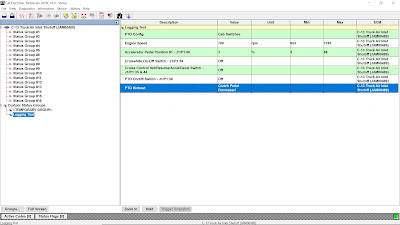
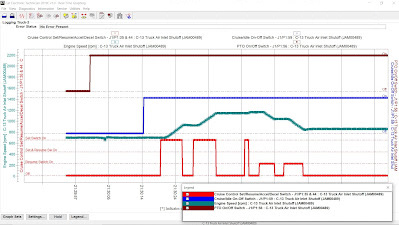
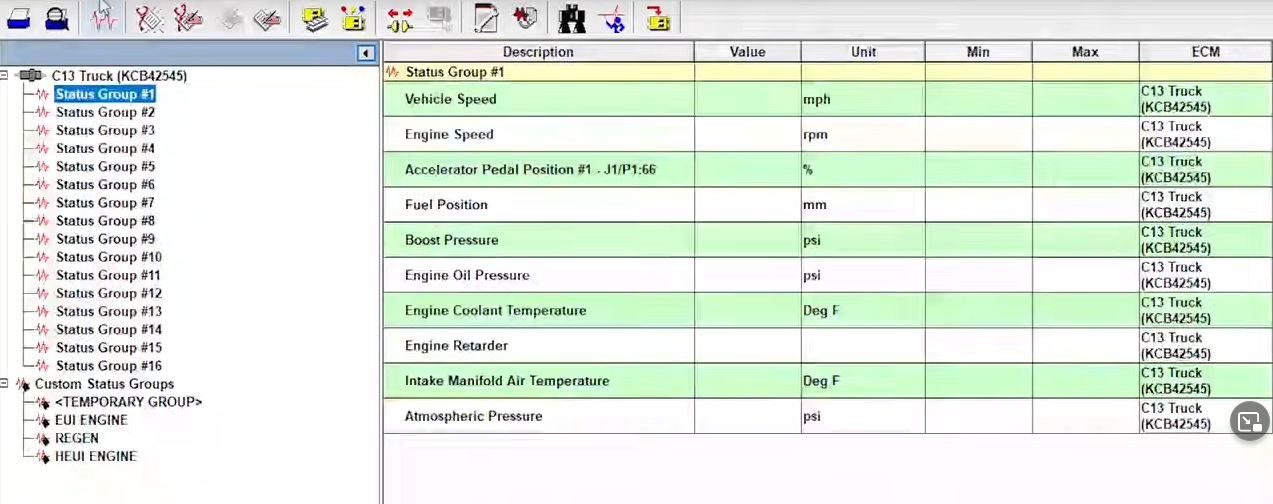
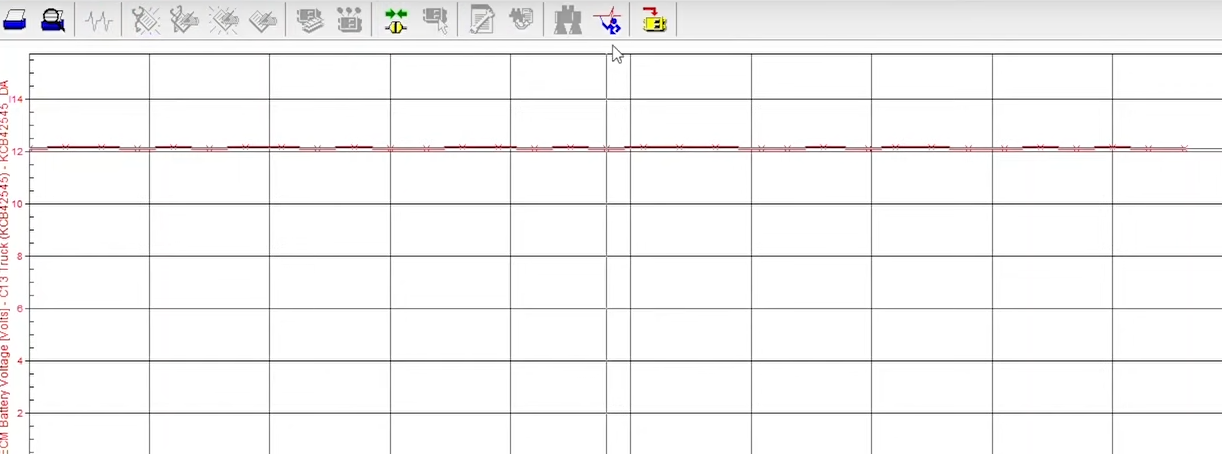
Then the status screen. The status screen will tell you what sensors are reading also will tell you inputs and outputs so if your exhaust break or your Jacobs break was set on it would show you what it’s set to if it’s reading properly. Such as the accelerator pedal position notice the min max as long as you on the screen it will keep the minimum and maximum, once you change screens though in the status screen to different status group it’s going to reset the minimum maximum from that previous screen and it will erase them forever. But it will now start recording mininum and maximum for the current screen.

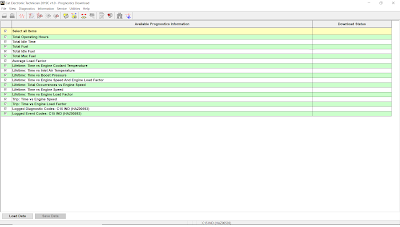
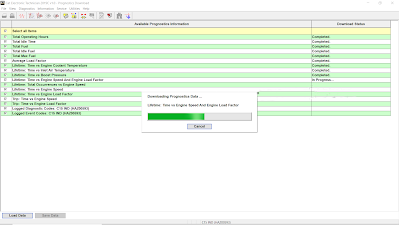
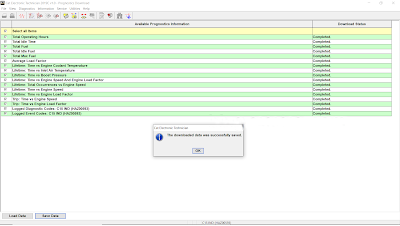
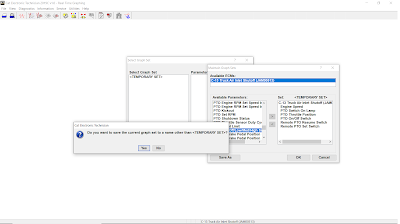
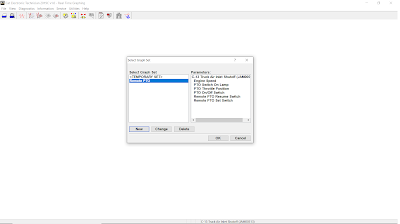
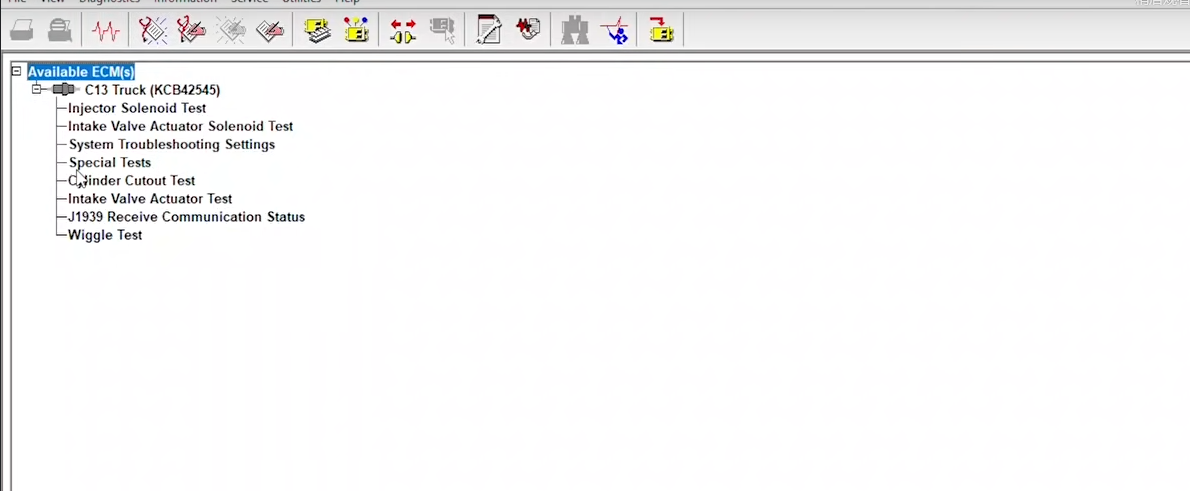
Diagnostic part displays trouble shooting codes if you click on that either in the logged or active events or diagnostic codes it going to take you to either something called component-based trouble shooting or going to try to log into sis which is cat’s service information system.

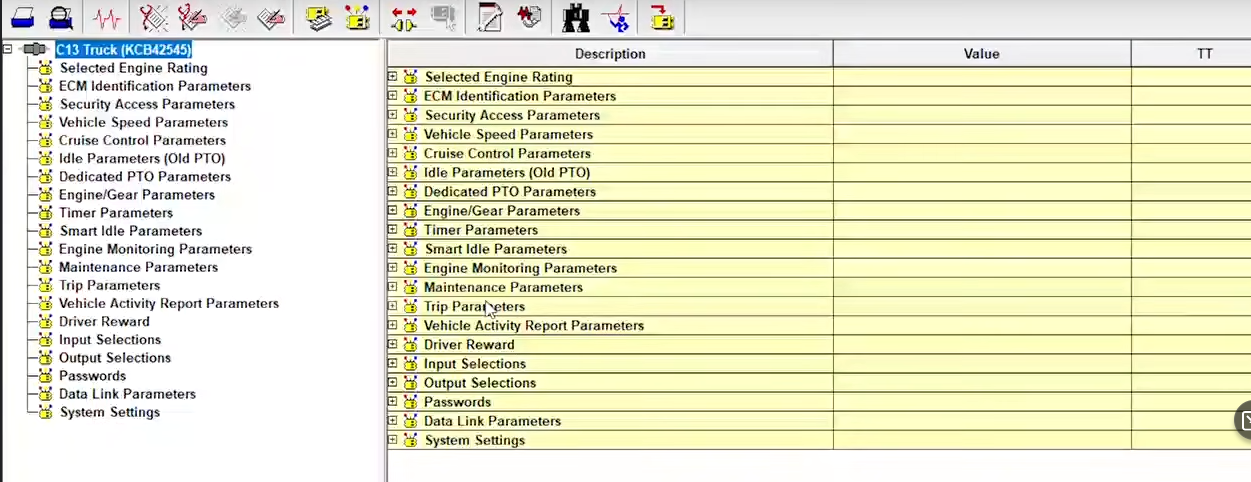
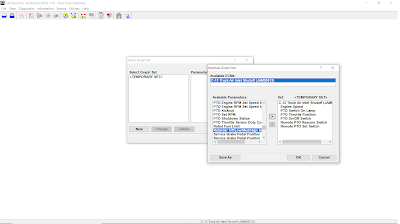
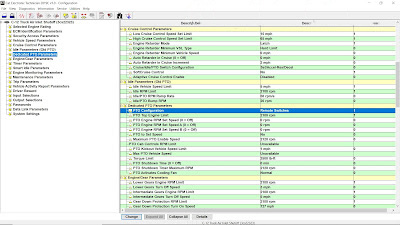
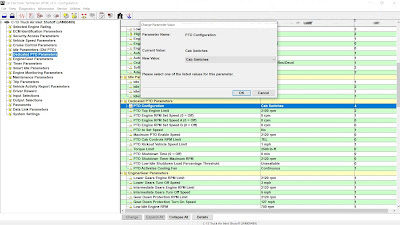
Configuration part will get easily messing stuff up if you do not know what you are doing. Take the vehicle speed limit for example, that is under vehicle speed parameters and it’s on the very top line there vehicle speed limit go up to 127 miles an hour however if you try to change it you may require factory password or a customer password .Under diagnostics there’s a lot of features


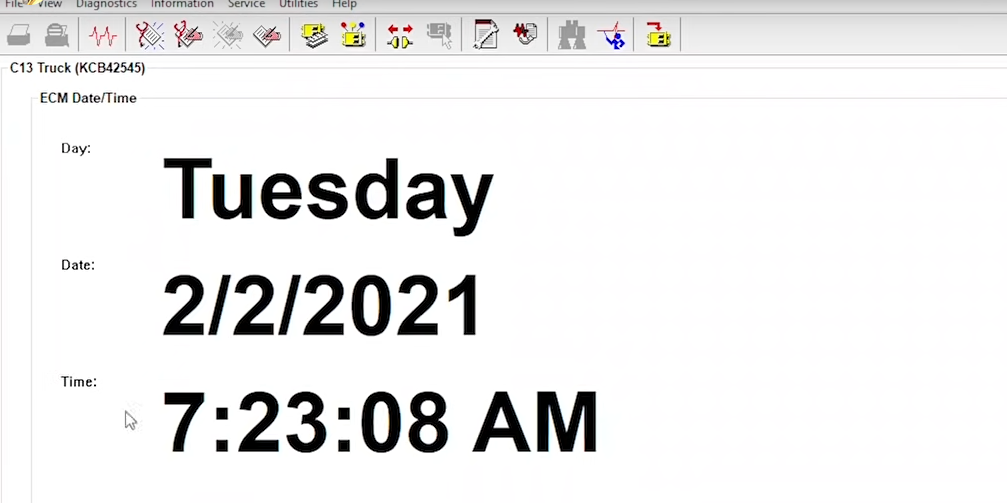
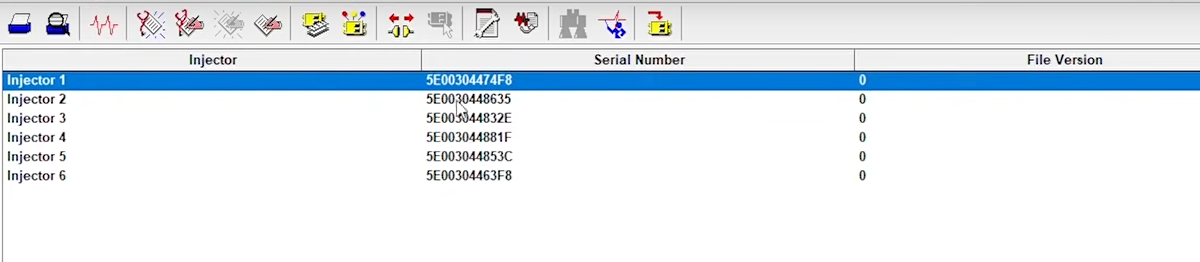
At service part you can change ECM date and time. This will enable you to change the ecm date and time a lot of the time it is not accurate. Calibration is where you do injector trim calibrations these are your injector trim files just like the fls and fts you should not be changing your injector trim files to just an arbitrary number they should match what is exactly on the injector those are there from the factory for a reason. To let the injectors in the engine run at optimal levels pls do not mess with your injector trim files leave them what they’re supposed to.


There is also trainer part would show you a bunch of different engines and machines you can click on the trainer mode and what it’s going to do is going to fake connect\ to one of these machines or engines. It going to let you do tests like a cylinder cutout test change parameters fake timing tests change configuration whatever you want to do you not hurting or break anything, or change a parameter not be able to change it back. because this is actual feature of Caterpillar ET Software. Pls use this if you unfamiliar with how to use et you will learn a lot.

The downside of the trainer is of course you’re not actually hooked up to a new engine so you’re not going to be able to do real troubleshooting where you can actually hear the engine running, hear a tone change when a cylinder cut out things. There is a lot of features to et for you to explore.

2022年4月11日星期一

Cat Caterpillar ET 2022A Electronic Technician Diagnostic Software Released

 Latest Version CAT Caterpillar ET 2022A Electronic Technician Diagnostic Software With 1 Time Free Activation

Note:
1.After receiving the payment, we will send you the software by email.
2. we will remote help customer installed and activation for a single PC by Teamviewer!


Diagnostic Software Caterpillar ET 2022A (replaces CAT ET 2021B, 2020C, 2019C) :
1.Latest Caterpillar ET 2022A Software to work with CAT/CAT3 Truck Scanner
2.With one free activation, can send software online
3.Support Multi-languages:English, Chinese, Danish, French, German, Italian, Japanese, Portuguese, Russian, Spanish
4. OS:Windows 7 32 bit, Windows 7 64 bit, Windows 8/8.1 32 bit, Windows 8/8.1 64 bit, Windows 10 32 bit, Windows 10 64 bit

PC, Communication Hardware, and Cable Requirements
To run the service tool, the next PC, communication hardware, and cable requirements must be met.
NOTE: The minimum PC Configurations should not be used as a standard when buying new personal computers for service tool purposes. If the existing equipment meets these minimum requirements, it will run the service tool.

PC Requirements
Recommended Configurations
PC containing a 2.0 GHz dual-core processor
3GB RAM
3GB of the available hard disk drive
DVD-ROM drive (optionally)
15.4-inch XGA Screen (1280x1024 compatible)
Microsoft Windows™ 7 Professional or Windows 8 Professional, Windows 10 Professional (Not tested with Home Edition) (Note: Windows 8 RT is not supported)
RS232 port with 16550AF UART or compatible (for use with Comm Adapter II)
USB 1.1 or 2.0 port (for use with Comm Adapter 3)
Ethernet RJ45 connector
Built-in pointing device or mouse
For security purposes, Microsoft Internet Explorer version 11 or newer or Microsoft Edge is recommended.
Note: The most recent version of Microsoft Internet Explorer may not be validated to work with the service tool.

Caterpillar electronic technician 2022A with WinFlash future is an updated version of the caterpillar dealer diagnostic software that can help technicians to diagnose existing and potential problems with their electronically controlled Caterpillar Engines and Machines.

To get the vehicle information the CAT ET Software must be connected to the Electronic Control Module (ECM). For this purpose, you need a suitable diagnostic link adapter (DLA), for instance, Genuine CAT Comm Adapter III .

The laptops with ARM CPUs (Snapdragon 8cx, Microsft SQ1, etc) type are not supported!

The list of supported CAT machines and engines can be found below:
Engines:
Electric Power
Electric Power Generation
Industrial
Marine Power Systems
Oil and Gas

Machines:
Articulated Trucks
Asphalt Pavers
Backhoe Loaders
Cold Planers
Compactors
Dozers
Drills
Excavators
Feller Bunchers
Forest Machines
Forwarders
Harvesters
Hydraulic Mining Shovels
Knuckleboom Loaders
Material Handlers
Motor Graders
Off-Highway Trucks
Pipelayers
Road Reclaimers
Site Prep Tractors
Skid Steer and Compact Track Loaders
Skidders
Telehandlers
Track Loaders
Underground - Hard Rock
Underground - Longwall
Underground - Room and Pillar
Utility Vehicles
Wheel Dozers
Wheel Excavators
Wheel Loaders
Wheel Tractor-Scrapers

What's New - 2022A
Microsoft® Windows™ 11 Compatibility

Service tool testing has been performed and the service tool is compatible with Windows 11.

ECM File Replacement Compare Feature

The service tool now has an ECM Replacement File Compare feature for troubleshooting purposes. This feature allows the user to compare one ECM replacement file with another from within the ECM Replacement feature screen. The feature will highlight the differences between the selected files as a whole or the user may select the “only show differences” checkbox.

Configuration Group Headings on ECM Replacement Feature

In order to help the user find ECM replacement configuration items easier, configuration items in the ECM Replacement, Fleet Configuration, and Product ECM features are now grouped under their group sub-headings, as is done in the main configuration feature.

What's New - 2021C
Feature Protection System Password Copy

The Feature Protection System (FPS) has a new "Easy Copy" link to copy passwords in a single operation. The service tool can automatically obtain the passwords from the clipboard and populate the FPS dialog. The service tool dialog also has a new "Easy Paste" button that allows the user to paste data of the correct format from the clipboard. Passwords can still be pasted using customary copy/paste operations, such as the context menu or the CTRL + V hotkey combination.

Screen Resolution Requirement Update

The minimum requirement for screen resolution has been updated to 1366x768, or at least 1366 pixels horizontally and at least 768 pixels vertically. The recommended screen resolution is at least 1600x1200. The service tool window displays with a minimum size of 1024x680.

What's New - 2021B
End of Support for Windows 8

Microsoft is ending extended support for Windows 8 as of January 2023. The service tool will be ending support for Windows 8 after the 2021C release.

Calibration Images

Images attached to calibration instructions will no longer need to be opened manually to be viewed by a technician. The service tool will now have split user interface windows for calibrations that display pictures. This will allow the technician to see the images without having to navigate away from the instructions. Images may be opened into individual windows and resized for better clarity. The user interface for calibrations that do not display pictures will remain unchanged.

Default PC Browser

The service tool will no longer automatically launch web pages in Microsoft Internet Explorer. Web pages will now launch in whatever application is configured as the default internet browser. Certain web pages require a specific browser and may launch in a different browser.

What's New - 2021A
No significant new features or feature enhancements

What's New - 2020C
No significant new features or feature enhancements

What's New - 2020B
Trainer Update – 299D3

The 299D3 Skid Steer Loader has been added to the Trainer application.

What's New - 2020A
Product Status Report Updates

The Product Status Report has been updated to include throttle configuration information.

Built-in Factory Password Generator

The experimental feature allows you to decode (18-Bit passwords not supported) factory passwords

What's New - 2019C
Indication of Selected Communications Adapter

The service tool now displays the selected communications adapter when the service tool is disconnected. The adapter name is displayed in the status area at the bottom right of the service tool window.

Communication Hardware
Caterpillar Communication Adapter III
Configuring Cat Electronic Technician to use the Communication Adapter 3
For Cat Electronic Technician to work with the Communication Adapter 3, the settings must be changed to select the Communication Adapter 3 as the Communication Interface Device:
Step 1 Start Cat Electronic Technician.
Step 2 Click the Stop Connect button when it appears.
Step 3 Select the Utilities menu.
Step 4 Choose “Preferences > Modify...”.
Step 5 Select the Communications tab.
Step 6 Select Cat Comm Adapter 3 (RP1210) and click OK.
NOTE: Because a growing number of products require multiple data link service, the “Enable Dual Datalink Service” checkbox has been pre-selected.
Servicing ECMs on more than one data link requires this check box to be enabled.
Failure to do this will result in undetected ECMs and reduced functionality.

Package Includes:
1pc x Caterpillar ET 2022A software (Can choose to send online)

2021年11月12日星期五

Injection Actuation Pressure Test using Caterpillar ET Software

Injection Actuation Pressure Test using Caterpillar ET Software

Injection-Actuation-Pressure-Test-using-Caterpillar-ET-Software-1

#Purpose
The Injection Actuation Pressure Test function checks for leaks on all hydraulic components. This test allows the user to change the desired pressure and then view the actual pressure results.

#Accessing
To run the Injection Actuation Pressure Test function:
1). Connect CAT Caterpillar ET to the Service Tool connector.

2). Select Diagnostic Tests from the Diagnostics menu.

Injection-Actuation-Pressure-Test-using-Caterpillar-ET-Software-2

3). Select Injection Actuation Pressure Test from the submenu. Click Start.

Injection-Actuation-Pressure-Test-using-Caterpillar-ET-Software-3

4). The Injection Actuation Pressure Test screen is displayed.

Injection-Actuation-Pressure-Test-using-Caterpillar-ET-Software-4

#Screen Layout
The Injection Actuation Pressure Test screen has the following areas:
A. Display Area
The Injection Actuation Pressure Test setup condition area has three columns:

*  Description – Provides the name of the parameter set to run the test
*  Required Condition – Displays the value that the parameter must meet in order to run the test
*  Actual Value – Displays the actual value of the parameter listed in the Required Condition column

B. Status Parameter
The Injection Actuation Pressure Test status parameter area lists parameters and their current values and units of measure. The parameters listed in this area are dependent on the product being tested.

C. Status Line
Test status line indicates whether the test is “On” or “Off”.

Injection-Actuation-Pressure-Test-using-Caterpillar-ET-Software-5

D. Buttons
The Buttons available in the Injection Actuation Pressure Test screen are:

*  Start – Click this button to begin the Injection Actuation Pressure Test
*  Stop – Click this button to stop testing
*  Step Up – Click this button to increase the desired pressure of the system. Note: This button is disabled once the pressure value is at its maximum. It may or may not be available based on the current ECM.

Injection-Actuation-Pressure-Test-using-Caterpillar-ET-Software-6

*  Step Down – Click this button to decrease the desired pressure of the system. Note: This button is disabled once the pressure value is at its minimum. It may or may not be available based on the current ECM.

Injection-Actuation-Pressure-Test-using-Caterpillar-ET-Software-7

2021年11月10日星期三

Accessing Prognostics Download on Caterpillar ET Software

Accessing Prognostics Download on Caterpillar ET Software

#Purpose
Prognostics Download allows Prognostics data to be downloaded quickly and easily from all available ECMs. This information can be saved as a text file (.txt), refer to Figure 1.1 above.

When information is downloaded and analyzed at regular intervals, certain types of Histograms and cumulative data can be valuable in identifying repairs before failure occurs. Repairs before failure provide lower repair cost and improved machine availability.

All of the data in Prognostics Download is available through other service tool functions such as Logged Diagnostic Codes or Events, Current Totals, or Histograms. Prognostics Download conveniently gathers the information into one place.

#Accessing
To run the Prognostics Download function:
1). Connect CAT ET to the Service Tool connector.

2). Select Prognostics Download from the Information menu.

Accessing-Prognostics-Download-on-Caterpillar-ET-Software-1

3).  The Prognostics Download screen is displayed.

Accessing-Prognostics-Download-on-Caterpillar-ET-Software-2

#Screen Layout
The Prognostics Download screen has the following areas:
A. Display Area
The Display Area includes the following columns:

•    Available Download Information – This column displays the available Diagnostic Codes, Cumulative Totals, and Histograms. Note: All available prognostic items are preceded by a check box. Only the checked parameters are included in the data transfer. By default, all items are checked.
•    Download Status. This column displays the progress (In Progress…) as the information is downloaded. It also indicates if the download was Completed or if it Failed.

B. Buttons
The buttons available in the Prognostics Download screen are:

•    Load Data – The Load Data button allows data to be loaded from the ECM to the Prognostics Download screen.

→Click Load Data button. As the data is loading from the ECM, the Please wait… message is displayed. Then, the Downloading… progress bar displays, showing the status of the download.

Accessing-Prognostics-Download-on-Caterpillar-ET-Software-3

The downloading process can be canceled at any time by clicking the Cancel button. The Are you sure… message box displays. Click Yes to cancel loading the data. No partial file is saved. Click No to continue the download process.
→When the download is complete, a message box displays with the result of the download.

Accessing-Prognostics-Download-on-Caterpillar-ET-Software-4

→Click OK. The Prognostics Download screen is displayed with the Save Data button enabled.

•    Save Data – The Save Data button allows the downloaded Prognostic data to be saved to a file. Downloaded data, which may include Totals, Histogram data, Logged Codes, as well as ECM Summary information, can be saved to a text file. By default, the Prognostic data file is saved by Engine Serial Number, Date the log was taken, and the Time the log was taken to the second.

→Click the Save Data button. The Save As dialog box is displayed. By default, the file is saved in the Prognostic Download folder.

Accessing-Prognostics-Download-on-Caterpillar-ET-Software-5

→Click Save to accept the download file. A message box displays the saved status of the file.
→Click OK. The Prognostics Download screen is displayed.

Accessing-Prognostics-Download-on-Caterpillar-ET-Software-6

2021年10月6日星期三

Real Time Graphing using Caterpillar ET Software

 #Purpose

Real Time Graphing monitors ECM data and displays it in graphical form as it occurs. When running Real Time Graphing for the first time, a set of parameters must be selected to graph.

#Accessing
1). Connect Cat ET to the service tool connector, and establish communication with the ECM.
2). To run the Real Time Graphing function, select Real Time Graphing from the Information menu.

Real-Time-Graphing-using-Caterpillar-ET-Software-2

3). The Real Time Graphing screen is displayed. The Select Graph Set dialog box is displayed the first time this tool is accessed.

Real-Time-Graphing-using-Caterpillar-ET-Software-3

If the Select Graph Set dialog box displays:
1). Click the New button to create a new set. The Maintain Graph Sets dialog box is displayed.
2). Select a set from the Select Graph Set list box. As a graph set is selected, the parameters for that set display in the Parameters list box.

Real-Time-Graphing-using-Caterpillar-ET-Software-4

→Using the up and down arrows on the keyboard, each set and its parameters can be viewed consecutively in the Select Graph Set dialog box. If a set is created, it can be selected by the first letter of its name.
→A maximum of six parameters may be selected.
→Click the Save As button. The Save Graph Set dialog box is displayed, then click Yes.
→Enter the graph set name in the Enter Graph Set Name text box.

Real-Time-Graphing-using-Caterpillar-ET-Software-5

3). Click OK to accept the selected set. The selected set data is displayed in the Real Time Graphing screen.

Real-Time-Graphing-using-Caterpillar-ET-Software-6
Real-Time-Graphing-using-Caterpillar-ET-Software-7

#Screen Layout
The Real Time Graphing screen has the following areas:

ECM Title Area – The ECM title area displays the name of the selected graph set.
Error Status Text Box – The Error Status Text Box displays errors that occur while retrieving the parameter value. If more than one error occurs, the text box changes to a drop-down list for viewing all errors. “No Error Present” displays if there are no errors. “Unable to plot value” displays if the selected parameter cannot be plotted.
Legend Area – The Real Time Graphing legend area displays the selected parameters and is located above the graph. These parameters display with the corresponding line color. These colors cannot be changed. Parameters with an error will display an asterisk to indicate the parameter error is listed in the Error Status text box. The status parameter and its unit of value display on the y axis. These display on each side of the graph. These parameters display in the line color.
Graph Area – The Real Time Graphing area displays the time in seconds on the x axis (ten seconds is default) and the minimum and maximum values for each parameter on the y-axis. State parameters (for example, the only status is “On” or “Off”), initially display with dashed lines until the graph begins to trace the state parameter’s value.
Buttons – The buttons available in the Real Time Graphing screen are:

a). Graph Sets

Real-Time-Graphing-using-Caterpillar-ET-Software-8

b). Settings

Real-Time-Graphing-using-Caterpillar-ET-Software-9

To change the graph settings:
1. Click the Settings… button. The Graph Settings dialog box is displayed.
2. Select the time, in seconds, from the X-Axis Range drop down list.
3. In the Y-Axis Range area, the status parameters are listed with their minimum and maximum default values. To limit the range, double click on the cell and enter a new value.
4. In the Options area, click the options to be displayed on the Real Time Graphing screen.
→Click Show Grid to display grid lines on the graph area.
→Click Show Symbols to display symbols on the graph lines corresponding to the symbol above the parameter.

Real-Time-Graphing-using-Caterpillar-ET-Software-10

5. Click OK to accept the changes. The graph reflects the changes that have been made. To return to the Real Time Graphing screen without making any changes, click Cancel. Click Default to return the settings to the default positions.

c). Hold/ Resume
Click Hold to freeze the graph. Because the service tool immediately stops updating the graph, this will allow parameters to be viewed at a particular instance. The Hold button changes to Resume. Click Resume to have the service tool continue updating the display.

2021年10月4日星期一

How to Use CAT ET to Check the Programming of the Parameter Dedicated PTO Parameters

 Remote Throttle

PTO-Configuration-Test-Remote-Throttle-by-Caterpillar-ET-Software-1

1). Use CAT ET to Check the Programming of the Parameter Dedicated PTO Parameters.
→Connect CAT ET to the data link connector.

→Access the Dedicated PTO Parameters on Cat ET. Note the programming of the parameter PTO Configuration (Remote Throttle).

PTO-Configuration-Test-Remote-Throttle-by-Caterpillar-ET-Software-2

2). Check the Circuit for the PTO On/Off Switch.
→Activate the PTO operation.
→Access the CAT ET Status screens that display the following Status parameters. Read More: Status Tool on Caterpillar ET Software.

PTO Config (Remote Throttle)
PTO On/Off Switch – J1/P1:56

→Verify that each of the interlocks for the PTO are set. Then, while the CAT ET Status screen is being monitored, move the PTO On/Off Switch to the ON and OFF position.

PTO-Configuration-Test-Remote-Throttle-by-Caterpillar-ET-Software-3

3). A Remote Accelerator Pedal Position Sensor is connected to ECM P1/J1-68 (Input 8) when the PTO
Configuration is programmed to Remote Throttle.
→Monitor the Status of PTO Throttle Position and PTO Throttle Sensor Duty Cycle and output to controls the Engine Speed.

PTO-Configuration-Test-Remote-Throttle-by-Caterpillar-ET-Software-4
PTO-Configuration-Test-Remote-Throttle-by-Caterpillar-ET-Software-5

→Or you can manually measure the PTO Remote Throttle signal using the Multimeter (DC Volts and Duty Cycle).

4). Monitor using the Real Time Graphing while simulate the PTO Configuration Test (Remote Throttle). Read More: Real Time Graphing using Caterpillar ET Software.

PTO-Configuration-Test-Remote-Throttle-by-Caterpillar-ET-Software-6

When the PTO Configuration is programmed to Remote Switches or to Remote Throttle and the PTO On/Off Switch is On, the following circuits are ignored:
• Service Brake Pedal Position Switch 1
• Service Brake Pedal Position Switch 2
• Clutch Pedal Position Switch
• Neutral Switch
• Accelerator Pedal Position Sensor
• Cruise Control Set/Resume Switch that is located in the Cab.

2021年9月27日星期一

HOW TO USE CAT ET TO CHECK THE PROGRAMMING OF THE PARAMETER DEDICATED PTO PARAMETERS

 Remote Switches

How-to-Use-CAT-ET-to-Check-the-Programming-of-the-Parameter-Dedicated-PTO-Parameters-1

1). Use CAT ET to Check the Programming of the Parameter Dedicated PTO Parameters.
→Connect CAT ET to the data link connector.
→Access the Dedicated PTO Parameters on Cat ET. Note the programming of the parameter PTO Configuration (Remote Switches).

How-to-Use-CAT-ET-to-Check-the-Programming-of-the-Parameter-Dedicated-PTO-Parameters-2

2). Check the Circuit for the PTO On/Off Switch.
→Activate the PTO operation.
→Access the CAT ET Status screens that display the following status parameters.
PTO Config (Remote Switches)
PTO On/Off Switch – J1/P1:56

→Verify that each of the interlocks for the PTO are set. Then, while the CAT ET Status screen is being monitored, move the PTO On/Off Switch to the ON and OFF position.

How-to-Use-CAT-ET-to-Check-the-Programming-of-the-Parameter-Dedicated-PTO-Parameters-3

3). Check the Status of the Set/ Resume Input.
→View the Status parameter on CAT ET for the Remote PTO Set Switch – J1/P1:58 and for the Remote PTO Resume Switch – J1/P1:60.
→While the Status screen of CAT ET for the switch is being monitored, perform the following procedure in order:
-Put the Remote PTO Set/Resume Switch in the Set position. The status of the Remote PTO Set Switch – J1/P1:58 changes from “OFF” to set switch “ON” when the Remote PTO Set Switch is moved to the SET position, and the Engine RPM will increase.

How-to-Use-CAT-ET-to-Check-the-Programming-of-the-Parameter-Dedicated-PTO-Parameters-4

-Put the Remote PTO Set/Resume Switch in the Resume position. The Status of the Remote PTO Resume Switch – J1/P1:60 changes from “OFF” to resume switch “ON” when the Remote PTO Resume Switch is moved to the RESUME position, and the Engine RPM will decrease.

How-to-Use-CAT-ET-to-Check-the-Programming-of-the-Parameter-Dedicated-PTO-Parameters-5

-Also monitor the Status of the PTO Set RPM, will changes from 0 RPM to actual Engine Speed (will equal) and the PTO Kickout (Not Kicked Out).

How-to-Use-CAT-ET-to-Check-the-Programming-of-the-Parameter-Dedicated-PTO-Parameters-6

-PTO Kickout value will changes to PTO Switch Turned Off when the PTO On/Off Switch is turned to the “OFF” position.

How-to-Use-CAT-ET-to-Check-the-Programming-of-the-Parameter-Dedicated-PTO-Parameters-7

4). Monitor using the Real Time Graphing while simulate the PTO Configuration Test (Remote Switches).

How-to-Use-CAT-ET-to-Check-the-Programming-of-the-Parameter-Dedicated-PTO-Parameters-8

When the PTO Configuration is programmed to Remote Switches or to Remote Throttle and the PTO On/Off Switch is On, the following circuits are ignored:
• Service Brake Pedal Position Switch 1
• Service Brake Pedal Position Switch 2
• Clutch Pedal Position Switch
• Neutral Switch
• Accelerator Pedal Position Sensor
• Cruise Control Set/Resume Switch that is located in the Cab.

2021年9月22日星期三

HOW TO USE CAT ET TO CHECK THE PROGRAMMING OF THE PARAMETER DEDICATED PTO PARAMETERS

 Cab Switches

PTO-Configuration-Test-Cab-Switches-using-Caterpillar-ET-Software-1

1). Use CAT ET to Check the Programming of the Parameter Dedicated PTO Parameters.
→Connect CAT ET to the data link connector.
→Access the Dedicated PTO Parameters on CAT ET. Note the programming of the parameter PTO Configuration (Cab Switches).

PTO-Configuration-Test-Cab-Switches-using-Caterpillar-ET-Software-2

2). Check the Circuit for the PTO On/Off Switch.
→Activate the PTO operation.
→Access the CAT ET Status screens that display the following status parameters.
PTO Config (Cab Switches)
PTO On/Off Switch – J1/P1:56

→Verify that each of the interlocks for the PTO are set. Then, while the CAT ET Status screen is being monitored, move the PTO On/Off Switch to the ON and OFF position.

How-to-Use-CAT-ET-to-Check-the-Programming-of-the-Parameter-Dedicated-PTO-Parameters-3

3). Check the Status of the Cruise Control On/Off Switch. This switch must be ON before Cruise Control or Controlled Idle can be activated. This switch is ON when the switch is closed. When the switch is closed, the following terminals are connected:

P1-5 (AP Sensor/Switch Sensor Common)
P1-59 (Cruise Control On/Off Switch)

→Monitor the status for the Cruise/Idle On-Off Switch – J1/P1:59 while the Cruise Control On/Off Switch is cycled. The correct status for the Cruise/Idle On-Off Switch – J1/P1:59 is “On” when the Cruise Control On/Off Switch is in the ON position, and “Off” when the Cruise Control On/Off Switch is in the OFF position.

PTO-Configuration-Test-Cab-Switches-using-Caterpillar-ET-Software-4
4). Check the Status of the Set/Resume Switch.
→Place the Cruise Control On/Off Switch in the ON position.
→Monitor the status for the Cruise Control Set/Resume/Accel/Decel Switch P1-35 & 44 while the Set/Resume Switch is cycled. The correct status for the Cruise Control Set/Resume/Accel/Decel Switch P1-35 & 44 is Set Switch On when the Set/Resume Switch is in the SET position, and Resume Switch On when the Set/Resume Switch is in the RESUME position.

PTO-Configuration-Test-Cab-Switches-using-Caterpillar-ET-Software-5
PTO-Configuration-Test-Cab-Switches-using-Caterpillar-ET-Software-6

→When PTO On/Off Switch is turned to the “OFF” position, and the Clutch Pedal is depressed, the PTO Kickout value will changes to Clutch Pedal Depressed (before: Not Kicked Out).

PTO-Configuration-Test-Cab-Switches-using-Caterpillar-ET-Software-7

5). Monitor using the Real Time Graphing while simulate the PTO Configuration Test (Cab Switches).

PTO-Configuration-Test-Cab-Switches-using-Caterpillar-ET-Software-8

When the PTO Configuration is programmed to Cab Switches and the PTO On/Off Switch is ON, the following circuits can be used to interrupt a set RPM:
• Cruise Control Set/Resume Switch
• Service Brake Pedal Position Switch 1
• Service Brake Pedal Position Switch 2
• Clutch Pedal Position Switch
• Neutral Switch
• Cruise Control Pause Switch